Science concepts:torque (and a tiny bit of trigonometry)
Aikido. Hapkido. Jiu-jitsu. Judo. Brazilian Jiu-Jitsu. Chin-na. Dumog. The list of martial arts in which joint locks play a prominent role is vast, and the paradigms are almost as diverse. Small circles or big circles? Smooth motions or violently snappy? Certain arts tend to do joint locks a certain way. Is this because there are just that many different joint locks, or are all of these systems simply expressing the same locks in different ways? I would argue the latter.
Definition
Some people make a distinction between a “joint lock” and a “joint crank”, where a lock is immobilizing and a crank just hurts but the person can move to alleviate the pain. For the sake of this topic, I’m going to lump them both together since the mechanics applied are largely the same and a crank can usually be turned into a lock by isolating a part of your opponent’s body to prevent it from moving (usually the next joint closer/proximal to the body). For now, let’s consider a “joint lock” to be any movement that takes a joint beyond its comfortable range of motion, in any direction.
Deconstruction and Classification
There are only so many ways that joints can be locked. The shoulder can be rotated too far up and too far down (I’ve seen this called “branch up” and “branch down” in certain Kempo systems).
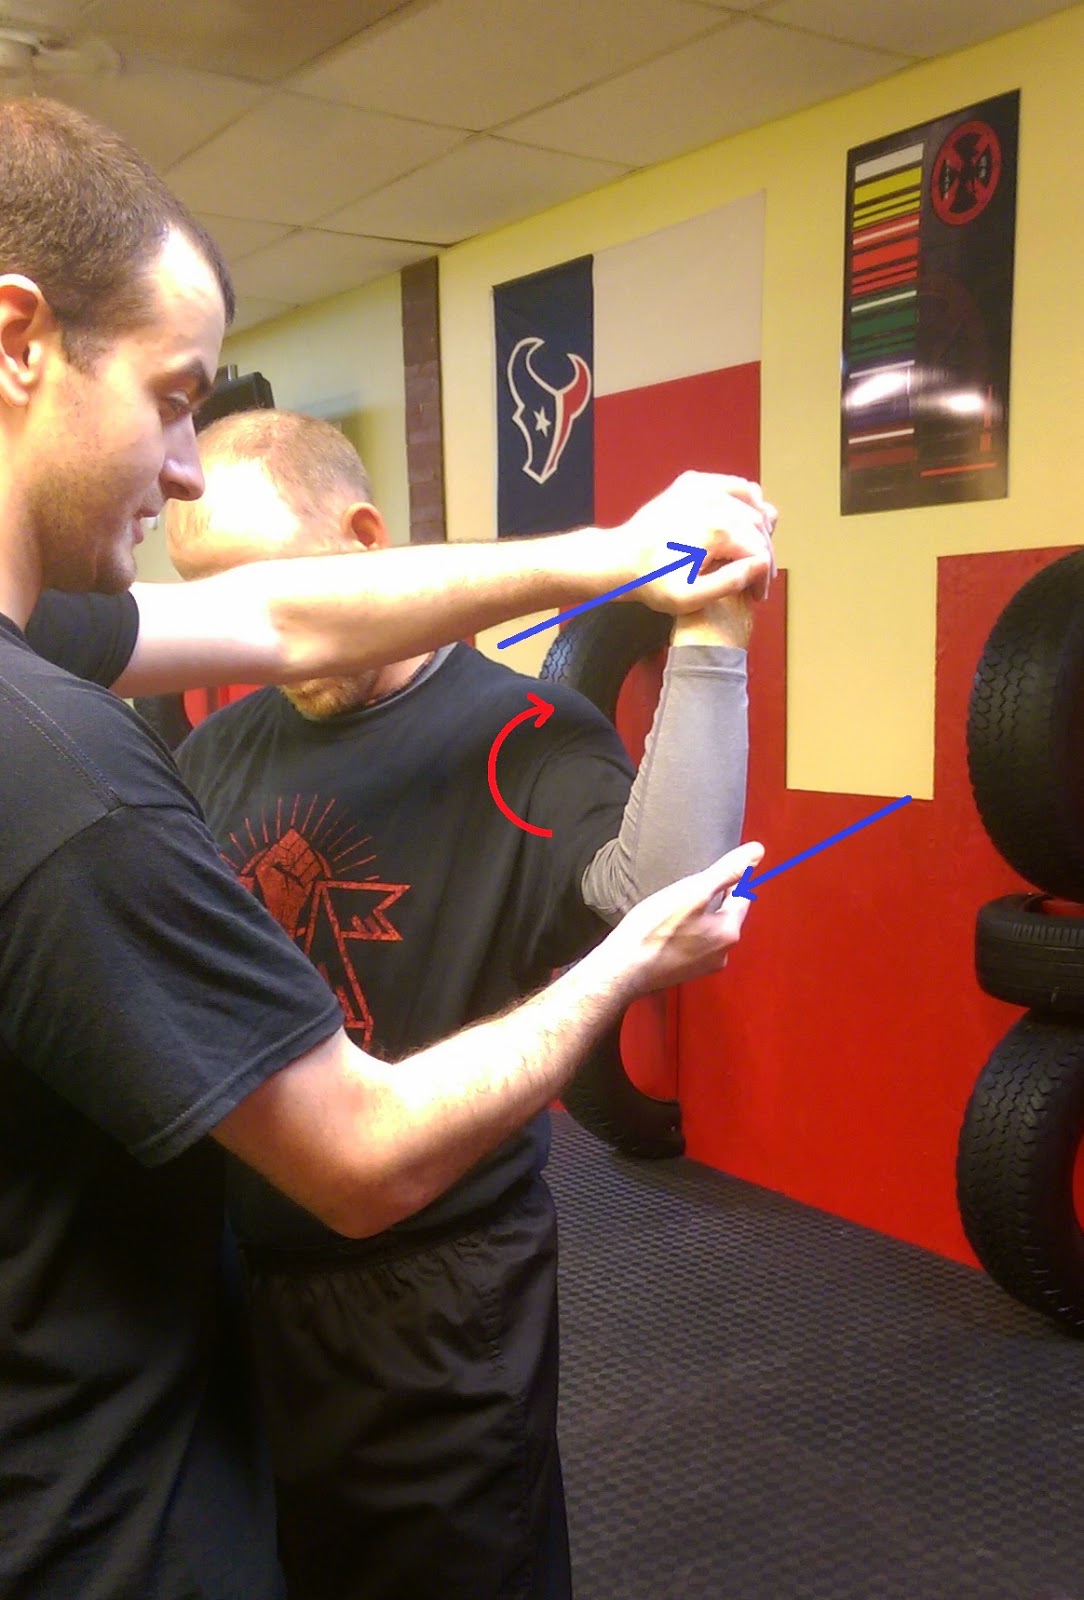 |
| Branch Up “Concept” Lock Blue arrows are the applied force Red semi-circle is the resulting torque |
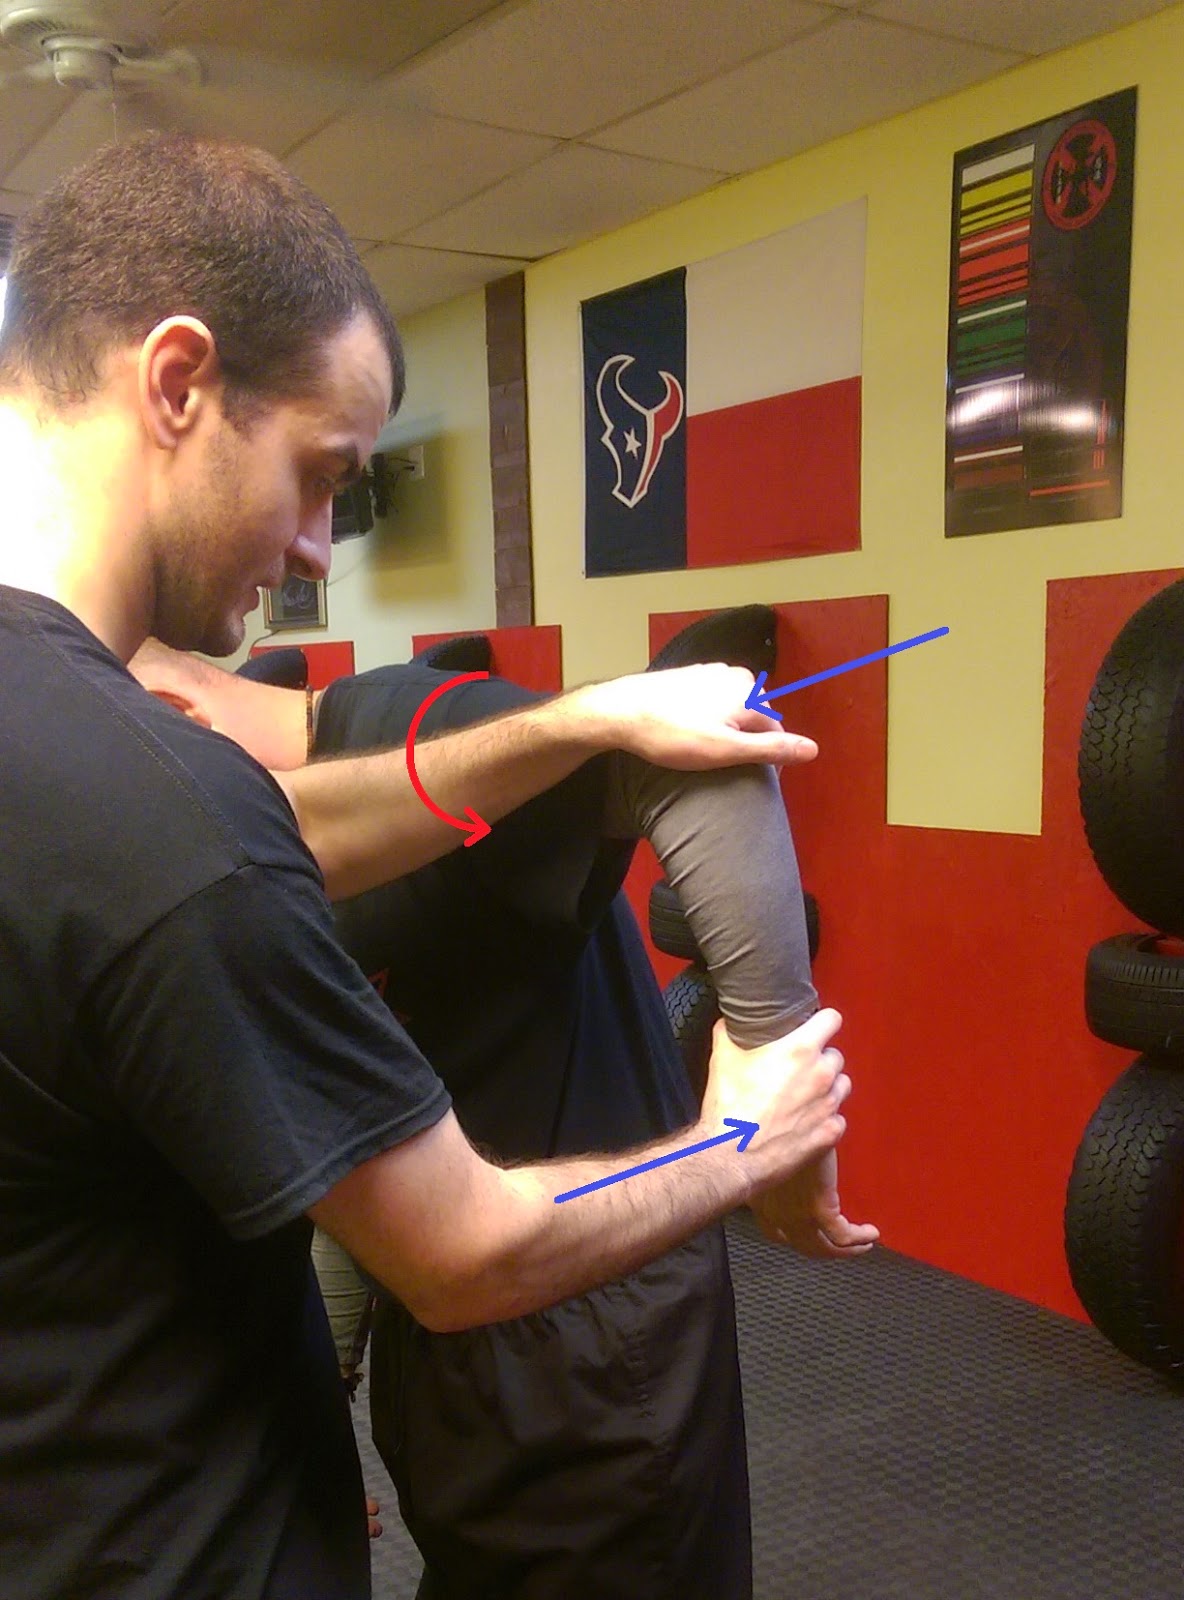 |
| Branch Down “Concept” Lock |
The elbow can be locked out straight or compressed too far (compression lock, which I’ll cover another time).
 |
| Straight Arm Lock |
 |
| Compression locks can get complicated (physics-wise). There’s a lot going on there that hurts. |
The wrist, being a complicated joint, has several ways to hurt it. It can twist too far to the right, too far to the left, too far forward, too far backward, and too far side to side. Here are just a few examples:
 |
| Wow, that’s a busy diagram There are basically to pairs of forces, each introduces some torque The torque arcs are in perpendicular planes if my awesome mspaint skills didn’t make that clear |
 |
| I’ll break this lock down into vectors down below |
Fingers hurt with just about any direction to the extreme. Hips are like shoulder, though the size of the bones and muscles make applying a lock very difficult. The knees are much like the elbows. The ankles are like the wrists, though only tend to hurt when twisting too far or pointing the toes too far. Toes are just like fingers. Just give them a good pull and you’ll probably break something. The spine is structurally different than the rest of the joints, but it is still susceptible to twisting too far in just about any direction.
Core Principles
Fundamentally, joint locks involve moving one part of your opponent’s body relative to the rest of it. If you move their wrist and the rest of their body comes along, then there’s no lock. You’ve just moved them. So, force needs to be applied in such a way that the rest of their body can’t move to compensate for the attempted lock, at least not fast enough to prevent the pain. To do this, you almost always have to provide force in two directions. (Ultimately, we really want to apply torque since all joints are pivot points.) For example, when applying a standing arm bar, you pull up on the wrist while pushing down on the elbow. To relieve the pain, the person usually throws their body down to keep their shoulder in line with their wrist and elbow (otherwise, their elbow will break). That works until the ground prevents them from continuing…then you can break their arm.
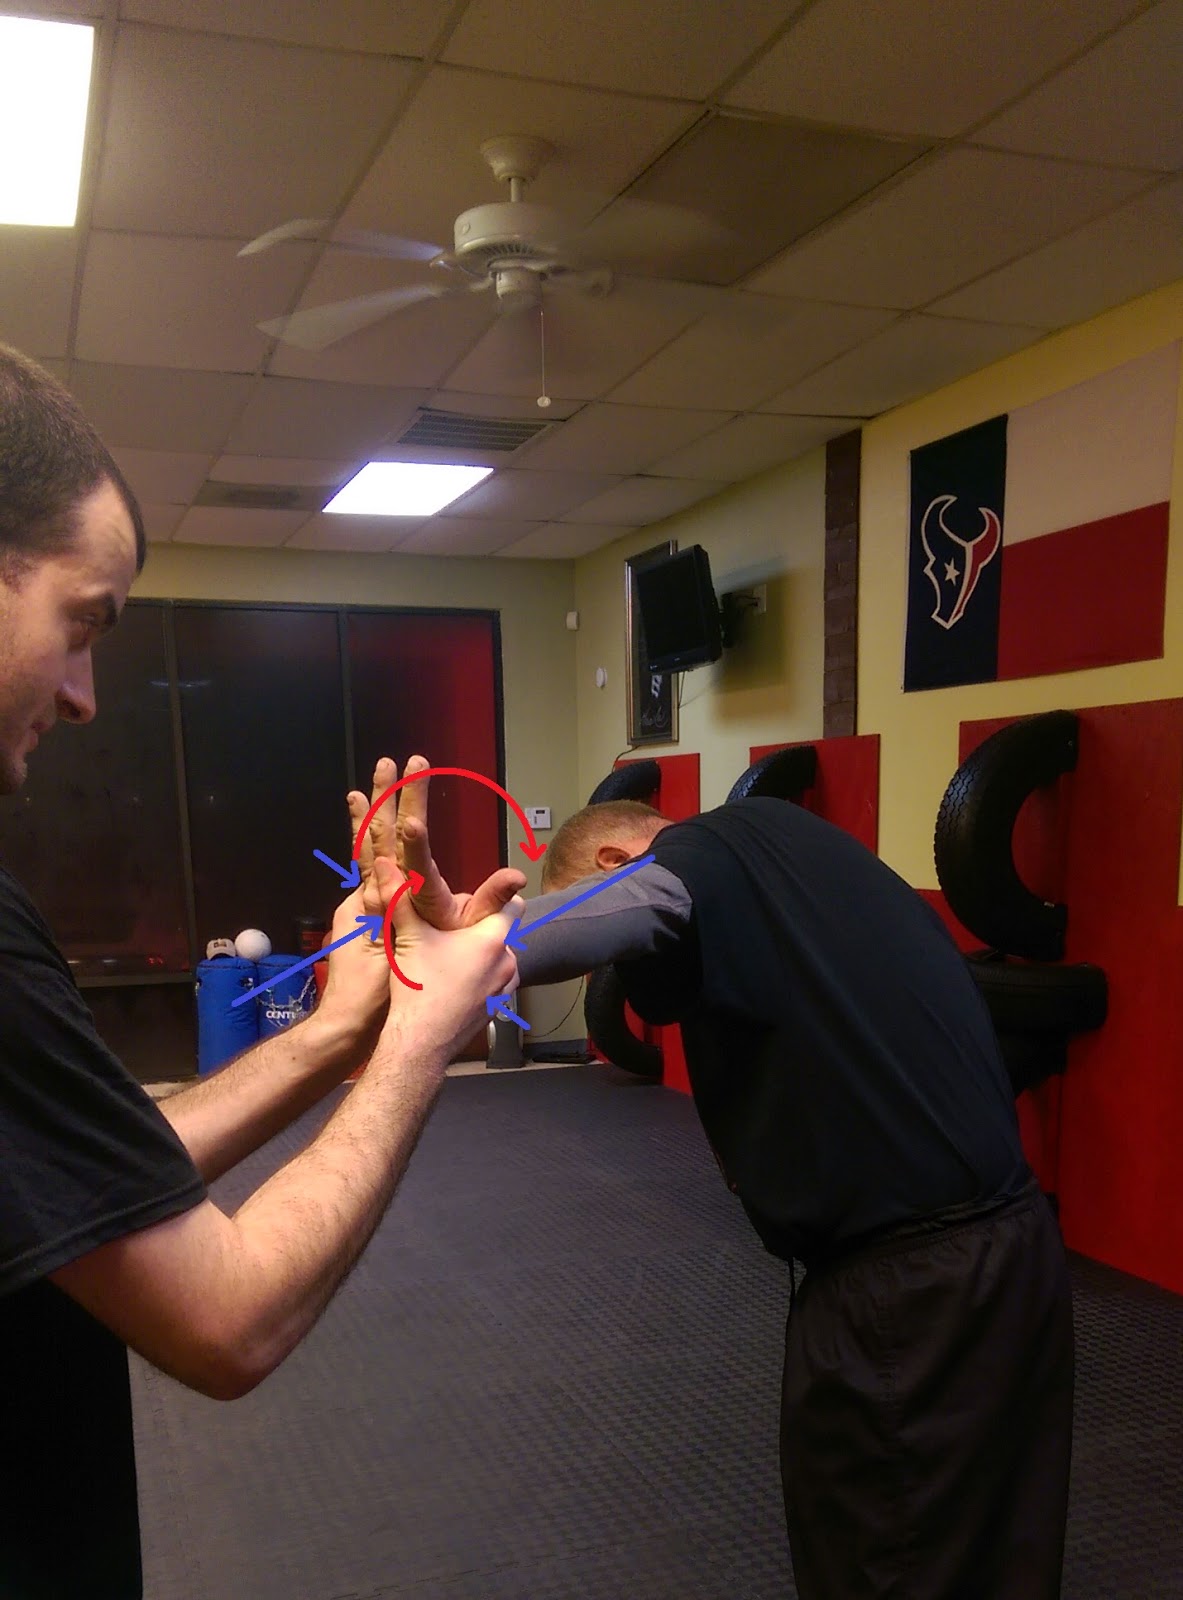
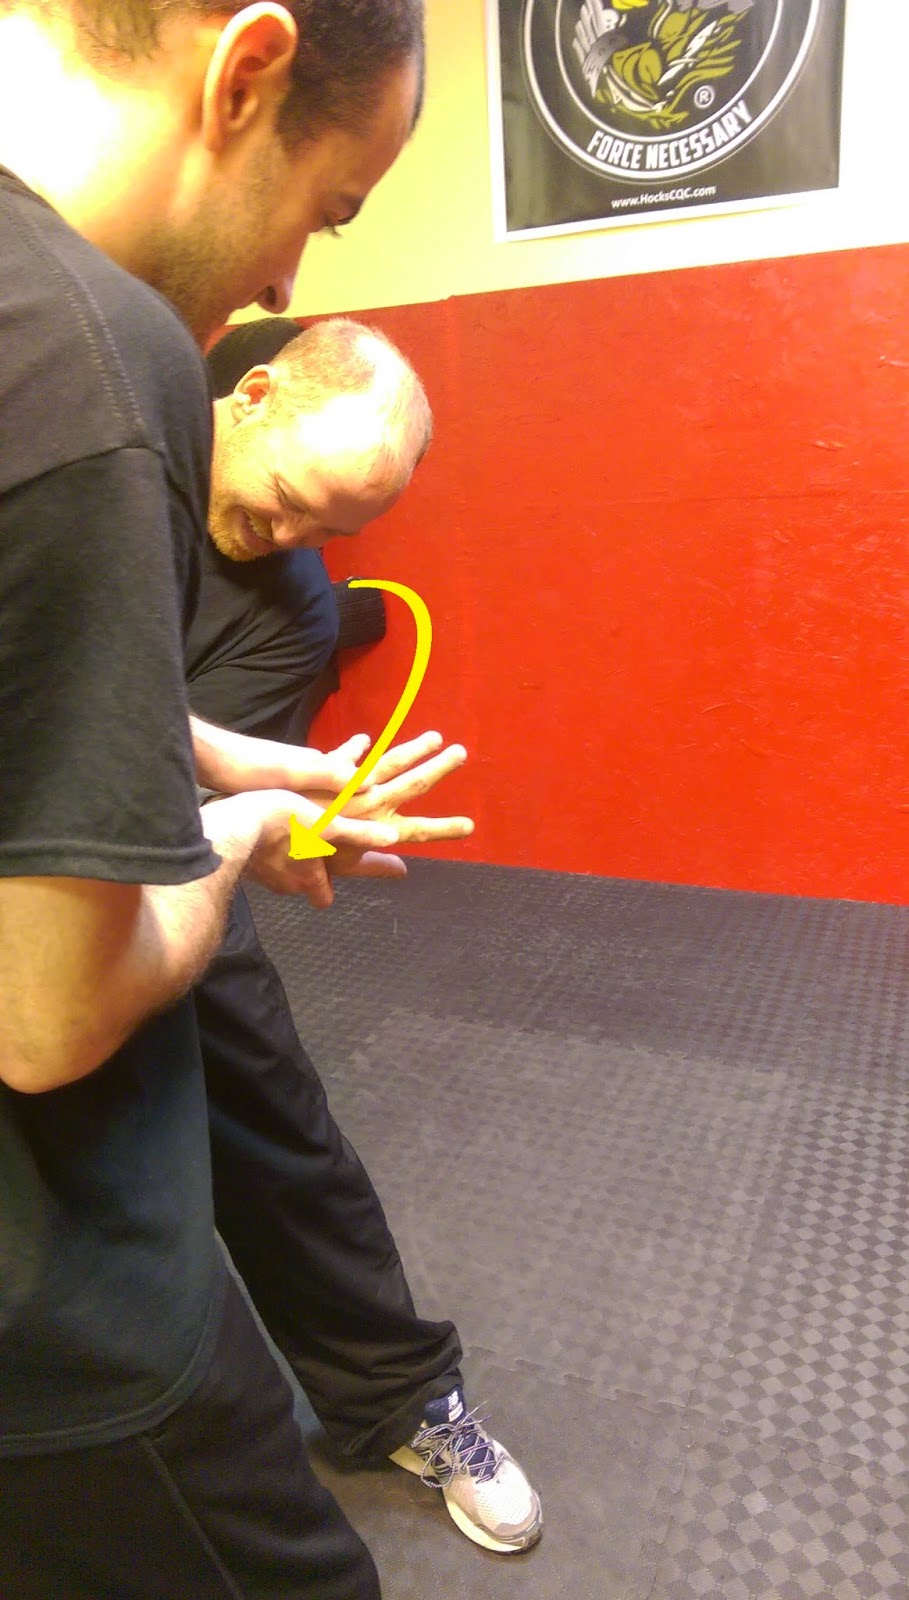
This works for more complicated locks, too. Consider the ubiquitous outside wrist lock (also pictured above). The textbook application of it involves two pairs of two-way forces.
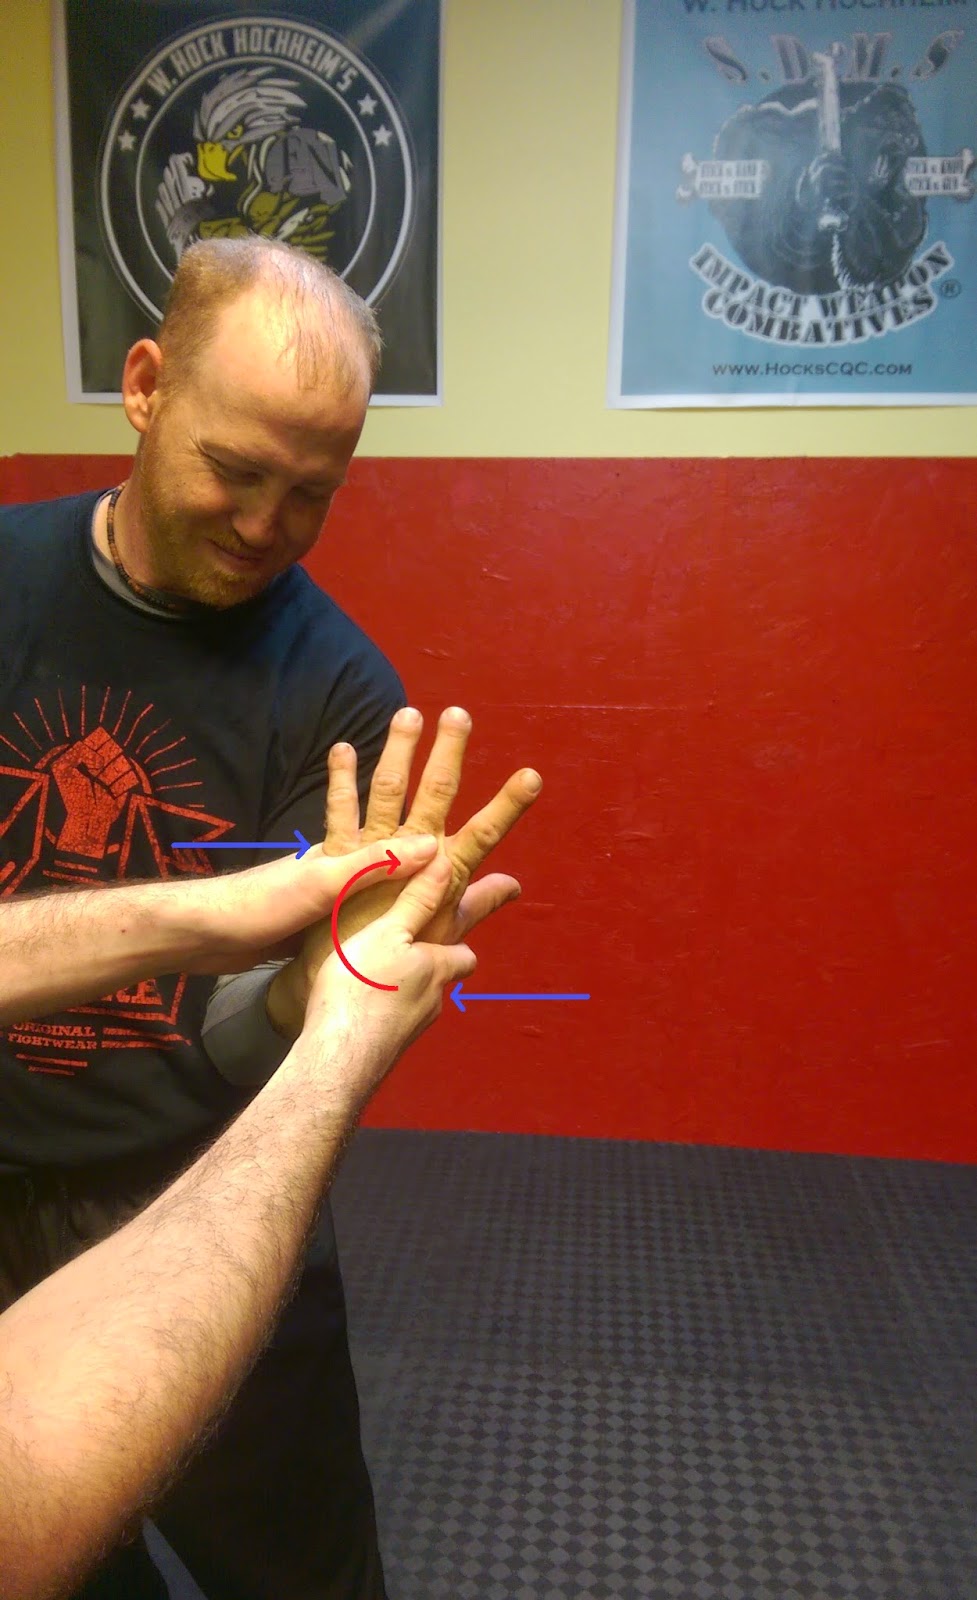 |
| “Turn it like a little steering wheel” |
 |
| The “death metal”‘ hand I have here is purely incidental |
The first pair pulls the wrist away from the opponent and pushes the knuckles towards them. The second pair involves pushing their wrist sideways towards the center and pushing the fingers towards the outside.
Since every joint lock involves two-way forces of some kind, then it would behoove us to understand the mechanics behind the principle.
The Science
Keeping all of these joint locks in mind, let’s do some physics for a bit. We understand force (F = ma). Force is what makes things change directions or speed. In much the same way that force builds on acceleration, torque builds on force. Torqueis a twisting force that causes rotation (sounds like joint locks). The formula is simple: t = Fd (physicists use t for torque, which is the Greek letter tau, because t was already taken [for time]).
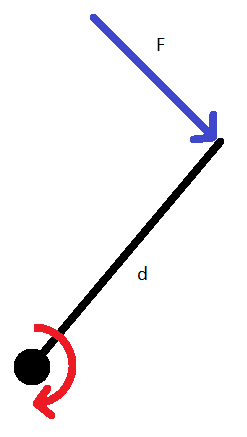
Actually, this picture isn’t quite general enough. We don’t always have the force being applied perfectly perpendicular to the effort arm.
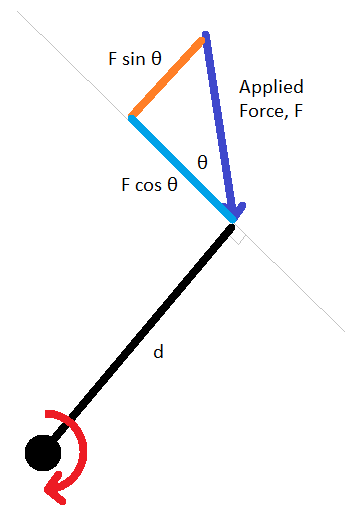 |
| A little trigonometry is necessary here Who remembers SOH CAH TOA? |
So, the formula is really t = (F cos q)d, which only accounts for the portion of the F vector that is perpendicular to the effort arm (recall that vectors can be split into components along arbitrary axes).
Let’s look at an example, which will build back up towards the standing arm bar. If you apply an upward force on your opponent’s wrist, then you are applying torque over a distance of their entire arm.
But this doesn’t result in a lock because the shoulder doesn’t lock that way (unless you go really high with the arm, which is impractical). We want to lock the elbow. So we also need downward pressure on or near the elbow (pressing just above the elbow into the tricep tendon gives me the best results…leverage and pain compliance. Yay!). But how much do we need to press down to prevent the elbow from moving up when we push the wrist up? It’s going to depend on whether or not your opponent is dropping down or not. But let’s apply the formula to find out how hard to press.
Let’s assume that the “elbow hand” is half way between the “wrist hand” and the opponent’s shoulder. Let’s also assume, for the time being, that the opponent is going to (dumbly and self-destructively) stay standing up. Then the torque applied by the wrist-hand is t1 = F1 d and the torque applied by the elbow-hand is t2= -F2 d/2. The negative sign shows up in the second equation because the force is in the opposite direction and I’m taking “down” to be negative at the moment. The “/2” shows up because the force is applied halfway between the wrist, which is daway from the shoulder, and the shoulder. So, the total torque is t = t 1 + t2 = F1 d – F2 d/2, which we want to be zero because we want to know how big F2 has to be to be to just barely stop the arm from moving up when the wrist is pushed up. So, if F1 d – F2 d/2 = 0, then F1 d = F2 d/2, which implies that 2F1= F2 (after a little algebra). That means that the force on the elbow has to be twice as much as the force on the wrist, just to keep the arm in position.
Ultimately, we don’t want to just prevent the arm from moving up. We want it to go down, preferably ending with their face hitting the ground. That means that we’ll likely need to press more than twice as hard at the elbow than at the wrist. To do that, you really need to get your body weight involved, which is something often missed by beginners who, consequently, can’t get this technique to work.
By applying the two torques in this way, the opponent either let’s all of that twisting force take up residence in their elbow ligaments, which have limited elasticity, or they move their body to alleviate the strain. So, either you mechanically diminish their ability to fight, or you put them on the ground. At which point, you can decide to mechanically diminish them anyway. Win-win.
Some Tips
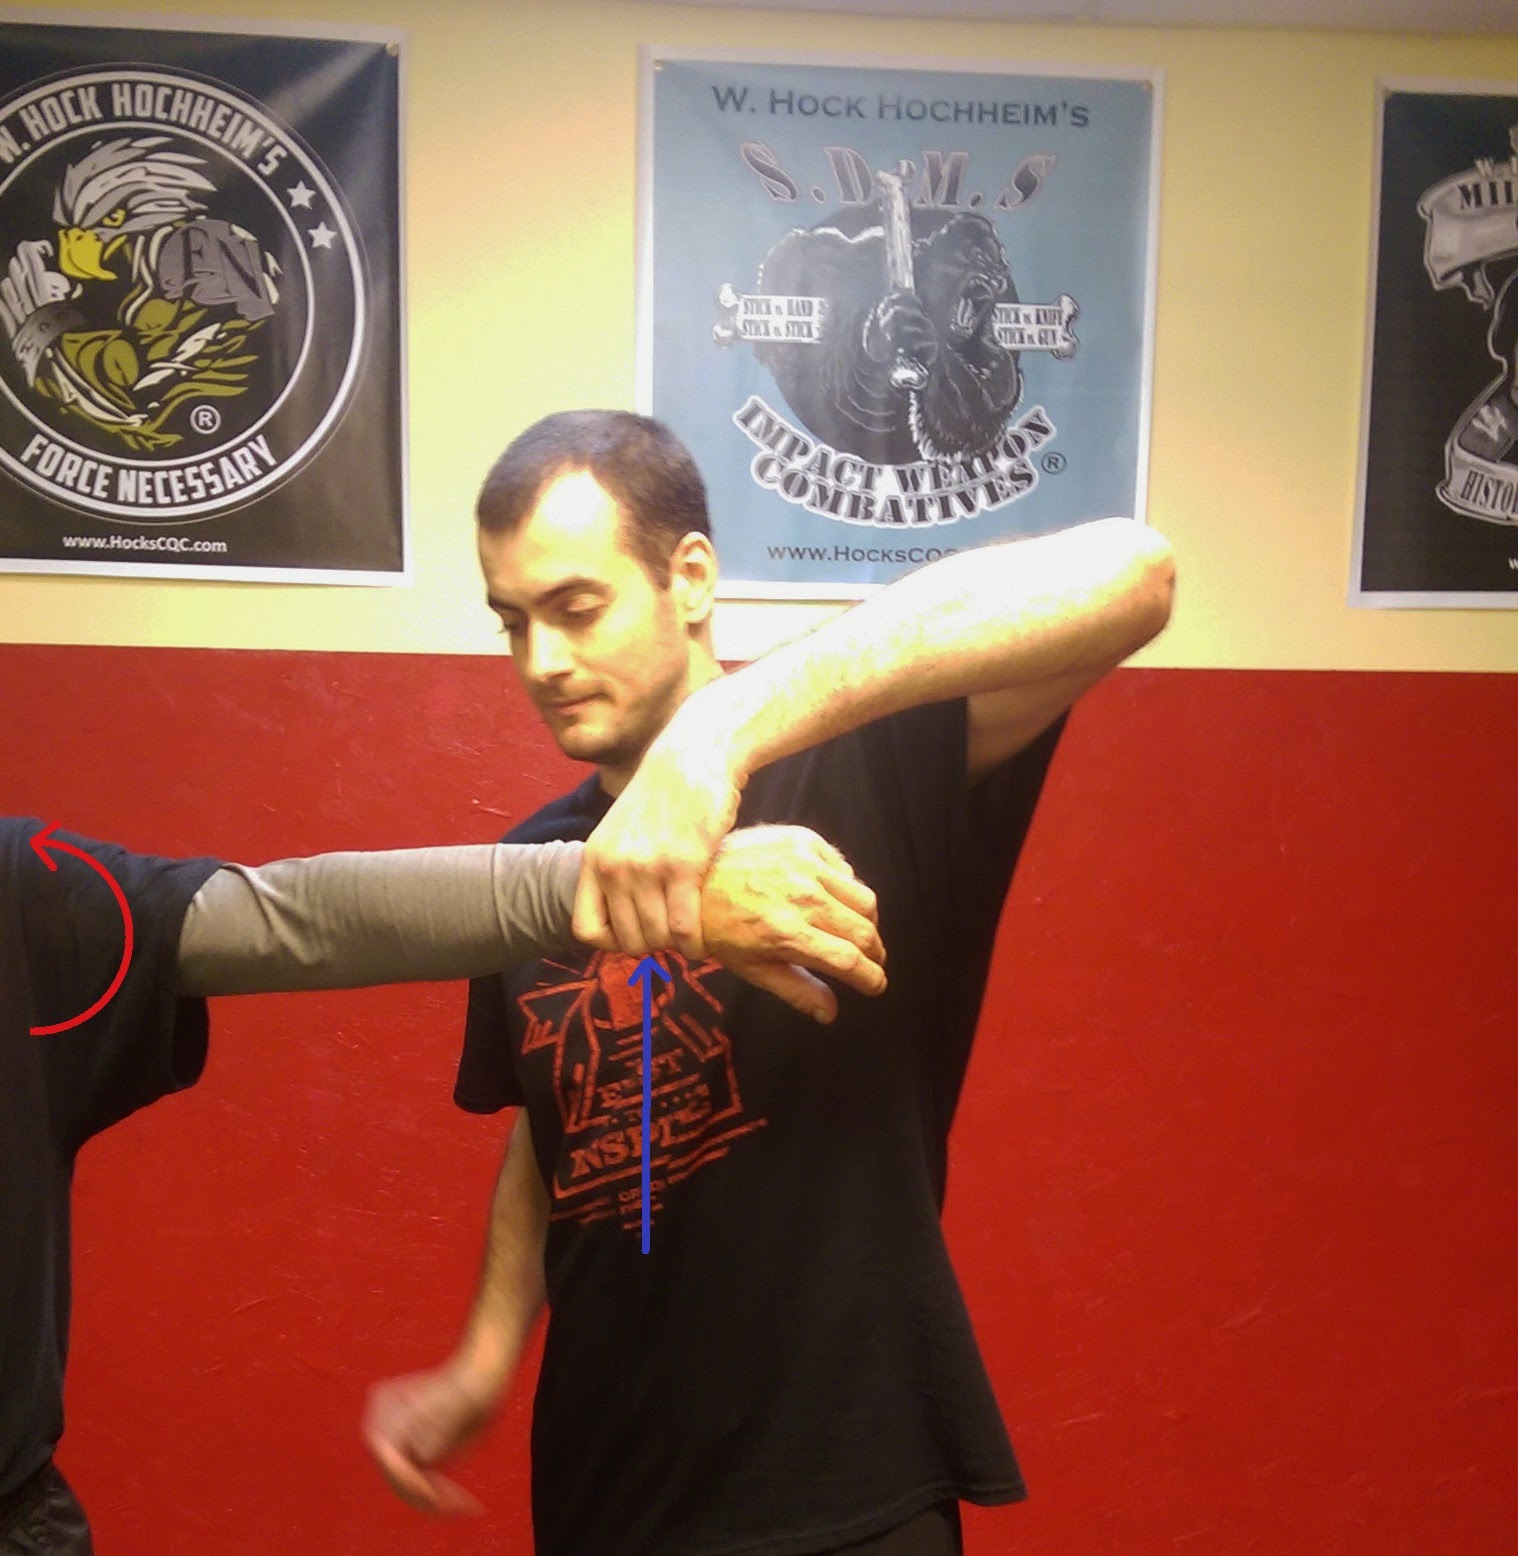
Here are a few tips to help augment the effectiveness of your joint locks. First, when you apply torque to a joint, there’s a certain natural arc that the limb will want to move through that is comfortable for the body. Don’t let them move through that arc. Adjust the direction of the forces you’re applying so the limb moves in a tighter than natural arc. Not only does this usually result in less physical movement on your part (making application faster), but it also tends to provoke the opponent to move the rest of their body to get back to that natural angle, which is far less painful. Consider these two pictures:
 |
| Natural Arc |
 |
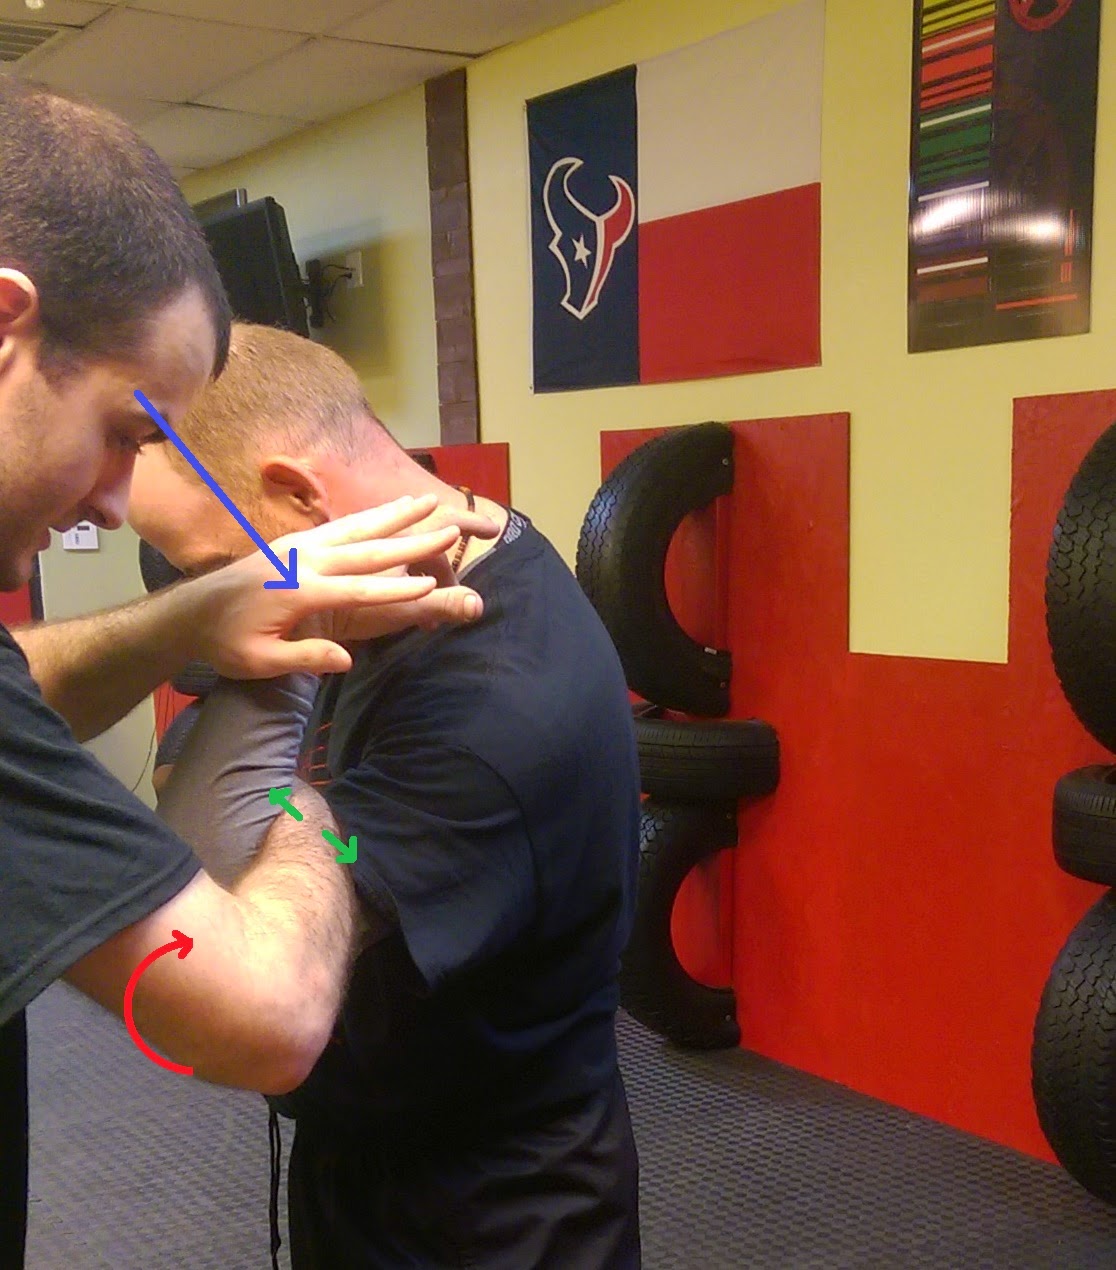
| Too-Tight Arc Notice how Mike has to move his hips and tilt his torso to get away from the pain, whereas I moved very little compared to the natural arc version |
This ties into the other tip I want to give you, which is that joint locks (and much of fighting) is about relative positioning not absolute positioning. This means that you should adjust the pressure that you’re applying based on the way the opponent’s body is oriented. Take the standing arm bar. What if their elbow is pointed down instead of up? The shoulder does rotate a fair ways around. Well, this joint lock is meant to hyperextend the elbow. So, push the elbow in a way that will hyperextend it, which in this case would be elbow UP and wrist DOWN, the opposite of before. Some beginners (and non-beginners, on occasion) fail to make this distinction and don’t understand why a technique works for them sometimes but not others. If the opponent rotates their arm a bit, then you need to follow it to maintain relative positioning.
Conclusion
I know that most people don’t like to bust out algebra if they can help it, but hopefully it wasn’t too bad. We may have solved some equations, but rest assured that doing so isn’t necessary during a fight. We only do this to gain insights and understanding into what makes a technique work. Once we have that understanding, we can both apply and teach the technique better because we know what needs to happen. Then just practice the scientifically sound method for your techniques and let the repetitions sink in.